
LVT Flooring Installation
LVT is 4–8mm thick — it shows every flaw in the subfloor underneath it. Rainwood Construction installs LVT flooring with the prep work that makes the material perform.
We respond within 24 hours
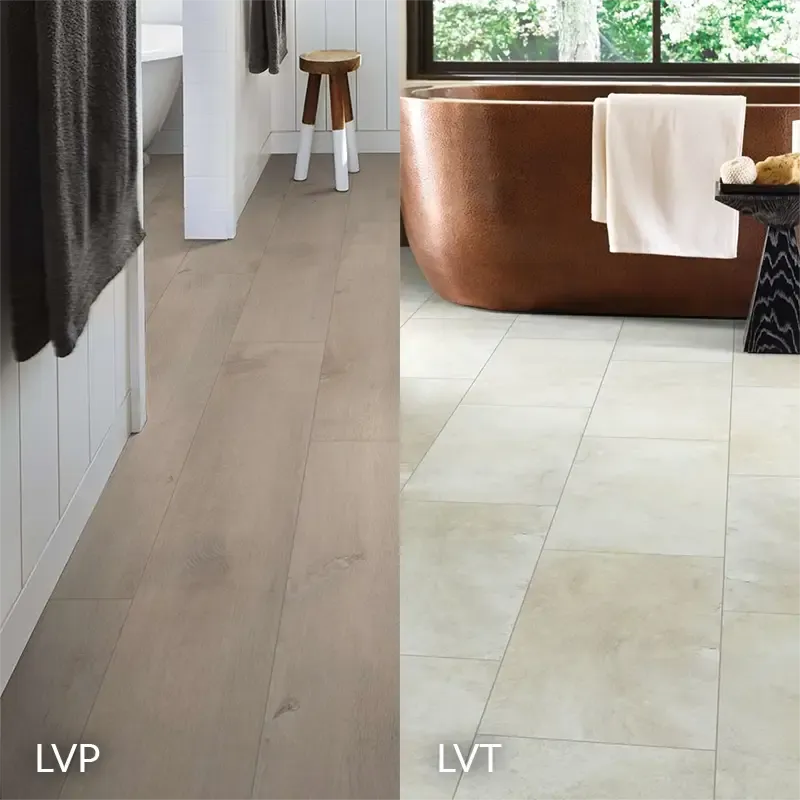
LVT vs LVP — Same Family, Different Install
LVT (luxury vinyl tile) and LVP (luxury vinyl plank) are both rigid-core or flexible vinyl. The difference is format: LVT mimics stone or ceramic tile in square or rectangular shapes. LVP mimics wood in plank format. Install methods overlap, but LVT has its own layout demands — grout lines on groutable products, tighter tolerances on subfloor flatness because tile formats show lippage more than planks.
The material is waterproof. The subfloor underneath it isn’t. LVT over a concrete slab without a vapor barrier traps moisture between layers. Over plywood with ridges or screw pops, every imperfection telegraphs through within weeks. LVT is 4–8mm thick — it conforms to whatever is below it. Flat subfloor: clean install. Uneven subfloor: visible problems fast.
That’s why LVT flooring installation done right is mostly prep. The click-and-lock assembly is the easy part.
LVT Flooring Installation Cost
LVT flooring installation cost runs $6–14/sq ft installed. Basic glue-down LVT on flat concrete: $6–9. Click-lock rigid-core over plywood: $8–12. Groutable LVT with grout lines mimicking real tile: $10–14. Material alone is $2–6/sq ft — the rest is labor, underlayment, and subfloor prep.
Labor cost to install LVT flooring depends on the surface underneath. Clean, flat plywood: fast. Concrete with dips, ridges, or residual adhesive from old flooring: self-leveling compound adds $3–5/sq ft to the prep. Transitions to adjacent rooms in different materials add T-molding or reducer work. Rainwood Construction quotes after walking the space — subfloor condition sets the real number.
OUR FLOORING SERVICES
What Rainwood Construction covers for LVT flooring installation projects.
Click-Lock LVT Installation
Rigid-core LVT in tile format — floating install over underlayment. No adhesive, fast assembly, easy to replace individual tiles later. We check subfloor flatness first: 3/16” tolerance over 10 feet. Self-leveling compound where needed. 1/4” expansion gap at every wall, hidden by baseboards.
LVT Plank Flooring Installation
Wood-look LVT planks in click-lock or glue-down. LVT plank flooring installation follows the same subfloor rules as tile format but with staggered joints — minimum 6” offset between end joints, random pattern. We rack the entire room before locking anything down to avoid short pieces at walls.
Glue-Down LVT Installation
Flexible LVT adhered directly to the subfloor with pressure-sensitive or full-spread adhesive. Thinner profile — 2.5–4mm — so subfloor flatness is even more critical. Every ridge shows. We skim-coat or use self-leveling compound on anything outside 1/8” over 10 feet. Glue-down doesn’t float, so there’s no expansion gap — the adhesive holds it in place.
Groutable LVT Installation
LVT tiles set with actual grout in the joints — looks and feels like ceramic without the cold or the cracking. Unsanded or urethane grout only. We set tiles with consistent spacers, let the adhesive cure 24 hours, then grout. Tighter layout tolerances than standard LVT because grout lines expose any unevenness.
Subfloor Prep & Moisture Mitigation
Self-leveling compound, plywood overlay, adhesive removal, 6-mil poly vapor barrier on concrete. Every LVT install starts here. We test concrete slabs with a calcium chloride kit or relative humidity probe — anything over 5 lbs/1,000 sq ft or 80% RH needs mitigation before flooring goes down.
Rainwood also offers interior renovations. Contact us to discuss your project.
COMMON PROBLEMS WE FIX
LVT flooring problems we see on renovation and repair calls.
WHY CHOOSE RAINWOOD CONSTRUCTION?
LVT flooring installers who skip subfloor prep are counting on the material to hide problems. It won’t — 4mm of vinyl conforms to everything underneath. Rainwood Construction preps the surface before the first tile goes down.
- Subfloor flatness checked and corrected to 3/16” over 10 feet before any LVT
- Moisture testing on every concrete slab — calcium chloride or RH probe
- Expansion gaps at every wall and fixed object — no peaking, no buckling
- Full room racked before locking — balanced layout, no short pieces at visible walls
10+
Years Experience
Great people. Showed up early and stayed late to get the job done. Work was excellent. Price was the best i found after four quotes. Would definitely use this company again.

We hired Rainwood Construction LLC to replace our French doors, and the result was outstanding. We knew going in this was more involved than a standard swap — we switched from inward to outward swinging doors, requiring extra attention to framing, flashing, and weatherproofing to keep everything sealed against water intrusion.Anatoliy was our point of contact and led the project from before to after, making sure the swing change and weatherproofing were planned and executed correctly. Igor and Vitaly handled the on-site installation and did excellent, high-quality work. The whole team was on time, professional, and delivered top-notch results. Can’t recommend them highly enough. 5 stars!

Every member of this crew I've had the pleasure of coming in contact with has been professional, excellent in their skillset, and fast. Pricing was reasonable for the excellent job they did.Last year we hired Rainwood to do plumbing and painting for a job. Both crews did such a great job, were thorough, and the level of detail was fantastic!We liked them so much we recently hired them for a quick job (installing ceiling fans). We messaged on a Wednesday and the job was done by Friday.Will absolutely hire Rainwood again and again for every job we do for our home.

Working with Rainwood Constructions on our house remodel was an excellent experience from start to finish. Their contractors were highly professional, skilled, and attentive to detail, and the quality of their work exceeded our expectations. The team communicated clearly throughout the project and ensured everything was completed on time without compromising quality. We’re extremely happy with the results and would highly recommend them to anyone planning a home remodel.

We had a very good experience with Rainwood Construction LLC and Toli during my brother’s home construction project in Shoreline. The team was professional, communicative, and paid close attention to detail throughout the process. We were especially happy with the quality of the fittings and finishing work, which turned out really well. The project was handled smoothly, and the overall workmanship met our expectations. Would definitely recommend them to others looking for reliable construction services.

We had an excellent experience with them on our sunroom project. The quality of the work was outstanding, they were easy to work with, and they clearly explained each step, the schedule, and key decisions (with various options to help us understand cost) along the way. Communication was solid from start to finish, and the final result looks great. Highly recommend, they are my new go to recommendation when friends ask.

Our Simple Process
What Rainwood Construction covers for LVT flooring installation projects.
Click-Lock LVT Installation
Rigid-core LVT in tile format — floating install over underlayment. No adhesive, fast assembly, easy to replace individual tiles later. We check subfloor flatness first: 3/16” tolerance over 10 feet. Self-leveling compound where needed. 1/4” expansion gap at every wall, hidden by baseboards.
LVT Plank Flooring Installation
Wood-look LVT planks in click-lock or glue-down. LVT plank flooring installation follows the same subfloor rules as tile format but with staggered joints — minimum 6” offset between end joints, random pattern. We rack the entire room before locking anything down to avoid short pieces at walls.
Glue-Down LVT Installation
Flexible LVT adhered directly to the subfloor with pressure-sensitive or full-spread adhesive. Thinner profile — 2.5–4mm — so subfloor flatness is even more critical. Every ridge shows. We skim-coat or use self-leveling compound on anything outside 1/8” over 10 feet. Glue-down doesn’t float, so there’s no expansion gap — the adhesive holds it in place.
Groutable LVT Installation
LVT tiles set with actual grout in the joints — looks and feels like ceramic without the cold or the cracking. Unsanded or urethane grout only. We set tiles with consistent spacers, let the adhesive cure 24 hours, then grout. Tighter layout tolerances than standard LVT because grout lines expose any unevenness.
Subfloor Prep & Moisture Mitigation
Self-leveling compound, plywood overlay, adhesive removal, 6-mil poly vapor barrier on concrete. Every LVT install starts here. We test concrete slabs with a calcium chloride kit or relative humidity probe — anything over 5 lbs/1,000 sq ft or 80% RH needs mitigation before flooring goes down.
Ready to Get Started?
Contact us today for a free on-site assessment. We’re here to help protect your home.
Call us now
425-750-1025
Email us
Anatoliy@rainwoodconstruction.com
Visit us
12310 Hwy 99, Everett, WA 98204
Hours
Mon-Fri 9:00 am–6:00 pm, Sat 11:00 am–5:00 pm, Sun Closed
FAQ
$6–14/sq ft installed. A 200 sq ft kitchen in click-lock rigid-core: $1,800–2,800. Same room with self-leveling compound on uneven concrete: $2,500–4,000. Groutable LVT with grout lines: $2,400–3,500. Subfloor condition is the biggest variable — not the tile itself.
Format. LVT comes in square or rectangular tile shapes — mimics stone or ceramic. LVP comes in plank shapes — mimics wood. Same core materials, same waterproof performance, same subfloor requirements. Layout and joint patterns differ. We install both.
Over vinyl, hardwood, or tile — yes, if the surface is flat, well-bonded, and clean. Over carpet: never — carpet isn’t a rigid surface and LVT click joints fail without solid support below. We check for loose tiles, raised seams, or adhesive residue. Adding LVT over existing flooring raises the floor height at transitions — reducer strips handle the step-down to adjacent rooms.
Single room with clean subfloor: 1 day. Open-plan living area with transitions: 2–3 days. Add subfloor leveling or old flooring demo: 3–5 days. Click-lock LVT is fast once the subfloor is flat. The prep is what sets the timeline.