Bathroom Tile Installation
Tile in a bathroom isn't decorative flooring — it's a waterproof assembly that either works or leaks. Rainwood Construction handles bathroom tile installation for floors, walls, and showers across the greater Seattle area.
We respond within 24 hours
What Makes Bathroom Tile Different from Every Other Room
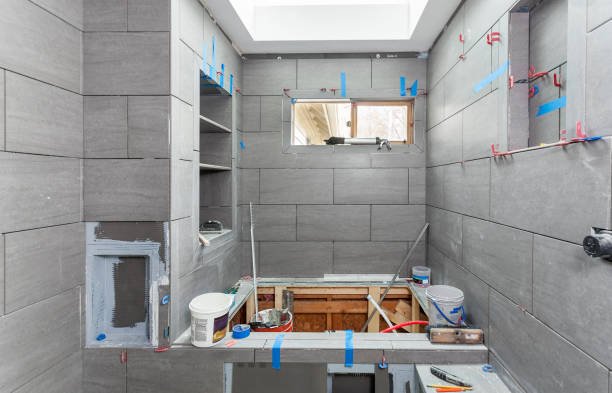
Bathroom tile sits in the wettest environment in the house. That changes everything about how it gets installed. A kitchen backsplash goes over drywall with mastic. Fine — it barely gets wet. Bathroom floor tile installation requires cement board or a bonded membrane over plywood, thinset rated for wet areas, and grout sealed against standing water. Bathroom wall tile installation in a shower or tub surround needs a waterproof substrate — Kerdi membrane, RedGard over cement board, or a foam panel system like Schluter DITRA — before a single tile goes up.
Skip the waterproofing and you won’t see the failure for two or three years. Water migrates through grout, through unsealed cement board edges, into the framing. By the time you see staining on the ceiling below or feel soft subfloor near the toilet, the damage is in the thousands. This is where most bathroom tile jobs fail — not at the tile, but at the layer behind it that nobody sees. A tile guy who starts setting tile on green drywall in a shower is building a demolition project for three years from now. We won’t do it.
Bathroom Tile Installation Cost
Bold intro: Bathroom Tile Installation Cost
Bathroom tile installation cost depends on three things: the tile itself, the substrate condition, and how complex the layout is. Standard porcelain or ceramic on a bathroom floor with clean cement board underneath: $8–$15 per square foot installed. That’s material plus labor for a straightforward grid or offset pattern. Bathroom shower tile installation cost runs higher — $15–$30/sq ft — because you’re tiling vertical surfaces, cutting around fixtures, and waterproofing the full enclosure.
For a typical full bathroom remodel — floor, shower walls, and a tub surround — expect $4,000–$9,000 in tile labor and materials on a 50-square-foot floor and 80–100 square feet of wall area. Bathroom tile installation cost per square foot climbs with large-format tiles (less cuts but more thinset coverage and leveling), natural stone (needs sealing and careful handling), and intricate patterns like herringbone or basket-weave that double the cut count. Where the estimate really moves is substrate work. If the existing subfloor bounces, it needs a layer of 1/4″ cement board or an uncoupling membrane before tile. If the shower framing is rotted behind old tile — and in Seattle-area bathrooms older than 20 years, it often is — that’s structural repair before tile work even starts.
OUR BATHROOM TILE SERVICES
What Rainwood Construction covers for bathroom tile installation projects.
Bathroom Floor Tile Installation
Porcelain, ceramic, natural stone, and large-format tiles on bathroom floors. Bathroom floor tile installation starts with the substrate — we check deflection with a straightedge and verify the subfloor meets TCNA standards for the tile size being installed. Large-format tiles (anything over 15" on one side) need a flat floor within 1/8" over 10 feet. If it's not there, we level with self-leveling compound or an uncoupling membrane before setting. Grout joints get sized to the tile — 1/8" for rectified porcelain, 3/16" for natural stone or non-rectified ceramic.
Bathroom Shower Tile Installation
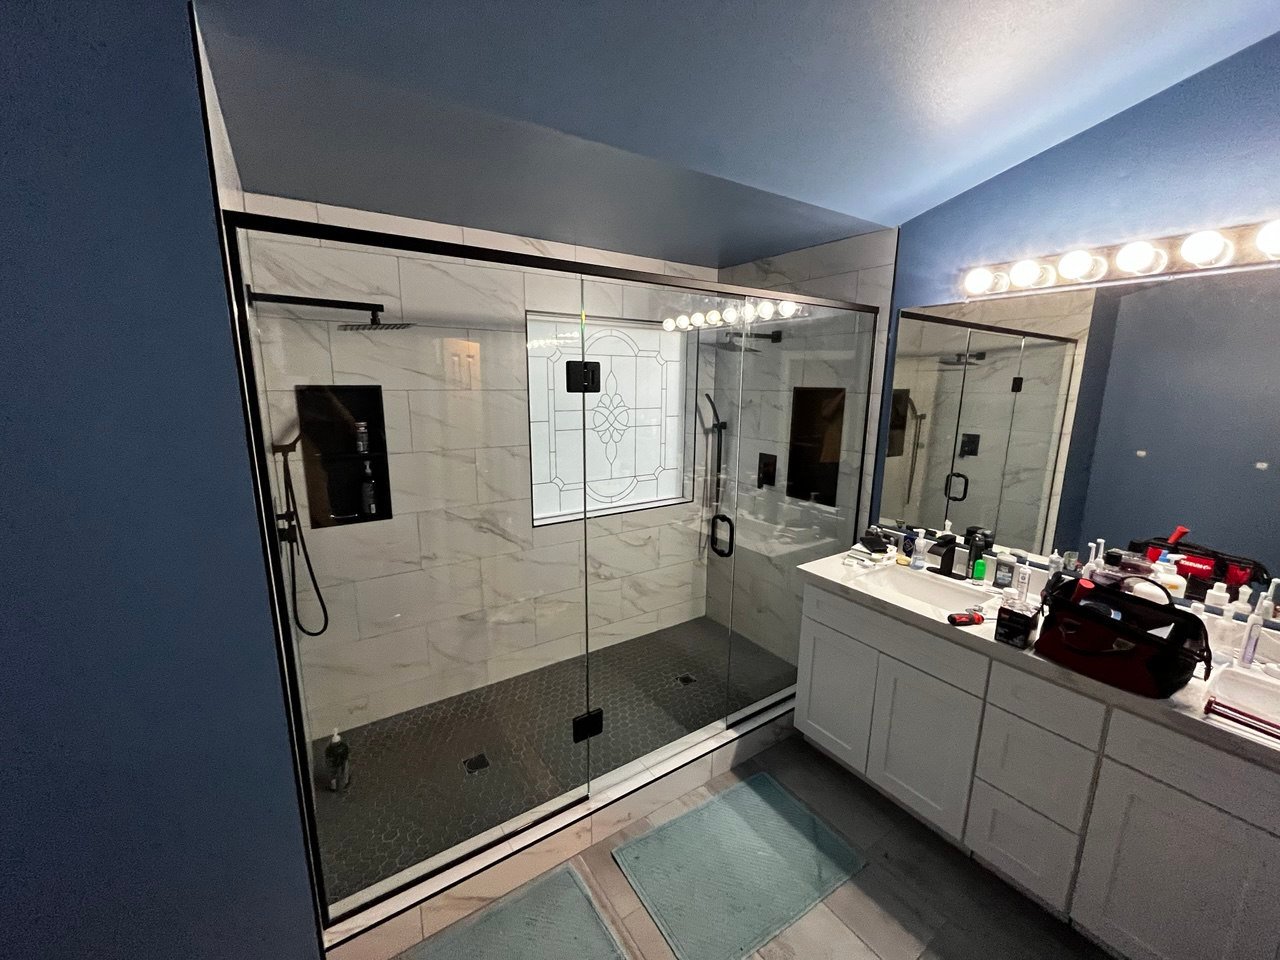
Full shower enclosures — walls, curb, floor, niche, and bench if specified. Bathroom shower tile installation is the most detail-intensive scope we do in a bathroom. Every surface gets waterproofed before tile — Schluter Kerdi or liquid-applied membrane with reinforced corners at every change of plane. Shower floors get a pre-slope under the membrane so water reaches the drain, then a mortar bed or bonded foam tray on top. The niche gets waterproofed as its own box. Corners get prefab inside and outside corner pieces, not just a folded sheet. No shortcuts here — shower leaks are the single most expensive bathroom failure to fix after the fact.
Bathroom Wall Tile Installation
Wainscot, full-height wall tile, feature walls behind vanities, and accent bands. Bathroom wall tile installation outside the shower zone doesn't require the same waterproofing as a shower, but it still needs proper substrate — cement board or moisture-resistant drywall, not standard drywall, in any bathroom. We set wall tiles bottom-up from a level ledger so the first course is straight, and work up. Cuts at the ceiling line get planned so they're at least half-tile wide — a 1-inch sliver at the top of a wall is the mark of a rushed layout.
Bathtub Surround Tile
Tile around alcove tubs, freestanding tub walls, and deck-mounted tub platforms. Bathtub tile installation follows the same waterproofing protocol as a shower — the splash zone above a tub gets just as wet. We run waterproofing membrane 6 inches above the showerhead height or tub spout, not just to the first tile row above the tub rim.
Bathroom Tile Repair
Cracked tiles, hollow tiles (debonded from substrate), failing grout, leaking shower pans. We probe and assess before quoting — sometimes a few tiles need reset, sometimes the membrane behind them has failed and the fix is a tear-out of that section. We match existing tile when possible; if the tile is discontinued, we source the closest match or replace a full wall for consistency.
Rainwood also offers interior renovations. Contact us to discuss your project.
See Our Work in Action
Watch how we transform homes with quality siding installation.
COMMON PROBLEMS WE FIX
Issues we see on bathroom tile jobs done by others.

WHY CHOOSE RAINWOOD CONSTRUCTION?
Bathroom tile installation is waterproofing work that happens to have tile on top. We treat it that way. Every shower and tub surround gets a full membrane system — not paint-on RedGard alone, but sheet or liquid membrane with prefab corners at every change of plane. We flood-test shower pans for 24 hours before tiling. If it holds water, it’ll hold water for 20 years. If it doesn’t, we fix it while it’s still easy and cheap.
- Waterproof membrane on every shower and tub surround — Schluter Kerdi or liquid-applied with reinforced corners, flood-tested before tile
- Full thinset coverage verified by pulling random tiles during set — minimum 85% on floors, 95% on shower walls per TCNA
- Substrate flatness checked with a 10-foot straightedge before setting — leveled if needed, not hoped for the best
- Layout dry-fit before adhesive — cut placement, pattern symmetry, and grout joint alignment confirmed with the homeowner before anything is permanentg — water hits the flashing, not the framing
10+
Years Experience
We had an excellent experience with them on our sunroom project. The quality of the work was outstanding, they were easy to work with, and they clearly explained each step, the schedule, and key decisions (with various options to help us understand cost) along the way. Communication was solid from start to finish, and the final result looks great. Highly recommend, they are my new go to recommendation when friends ask.

Rainwood construction completed 2 projects in my home recently. The first, which was to add a bar in my family room, which when completed fit so well that it looked like it always belonged there. It came out exactly how we wanted it and we love it. The second project was to completely remodel and modernize my 1955 original kitchen. The kitchen turned out fantastic! It’s light and bright with clean lines exactly how we had envisioned it. The team was polite, competent, hard working and always cleaned up after themselves at the end of the day. They always made sure to ask how I wanted things done when there were options, making suggestions where needed and made sure I was happy with the completion of items along the way. I was very pleased with the quality of the work, plan to use them again in the future and have already recommended them!

Excellent work done ✅ I’m really impressed and looking forward working further. Recommend 👍

Anatoliy and his company, is great person to have a business with!!!

We just remodelled the entire main floor of our house; the scope included changing floors, installing new cabinets including a drop ceiling, added a custom entertainment wall, and fully upgraded the powder room, among other work such as electrical upgrades including an EV plug. We are overall very happy with the work that the team has done, satisfied with the cost, and definitely recommend them to others.

Toli did great work renovating our home and upstairs bathroom. It was a great change.

Our Simple Process
From first contact to final walkthrough, we make siding projects straightforward and stress-free.
Request a Quote
Call or fill out the form. Tell us what's in the bathroom now and what you want — floor only, shower retile, full bathroom tile from floor to ceiling.
On-Site Assessment
We check substrate condition, measure the space, identify moisture issues or structural concerns, and discuss tile selection and layout options. Written scope with photos.
Clear Scope & Schedule
Tile spec, layout drawing, waterproofing plan, substrate prep scope, fixture coordination, line-item pricing, timeline. Most bathroom tile projects run 5–10 working days.
Installation & Finish
Demo if needed, substrate prep, waterproofing, tile setting, grouting, sealing, fixture trim-out, cleanup. Walkthrough before closeout.
Ready to Get Started?
Contact us today for a free on-site assessment. We’re here to help protect your home.
Call us now
425-750-1025
Email us
Anatoliy@rainwoodconstruction.com
Visit us
12310 Hwy 99, Everett, WA 98204
Hours
Mon-Fri 9:00 am–6:00 pm, Sat 11:00 am–5:00 pm, Sun Closed
FAQ
Bathroom ceramic tile installation on floors runs $8–$15 per square foot for standard porcelain or ceramic in a grid or offset pattern. Shower walls run $15–$30/sq ft because of waterproofing, vertical setting, and fixture cuts. Natural stone and large-format tiles add $3–$8/sq ft over standard porcelain. These numbers include material and labor but not substrate repair or demolition of existing tile — those are separate line items that depend on what’s behind the old surface.
Technically possible on floors if the existing tile is fully bonded (no hollow spots), level, and the added height doesn’t create a trip hazard at the door threshold. In practice, we recommend against it in showers. The waterproofing layer needs to bond directly to the substrate, and you can’t verify what’s behind old shower tile without removing it. A tile-over-tile shower is a gamble on someone else’s waterproofing — and if that fails, you’re tearing out two layers instead of one.
A floor-only retile in a standard bathroom: 2–3 days including substrate prep and grout cure. A full shower tear-out and retile: 5–7 days — one day for demo, one for waterproofing and flood test, two to three for tile setting, one for grout and seal. A complete bathroom — floor, shower, wainscot, and tub surround: 7–10 working days. Thinset and grout need cure time between stages, and rushing that leads to failures that show up months later.
Floor tile in a powder room or half-bath without a shower — that’s a reasonable DIY project if you’re comfortable with a wet saw and thinset. Anything in a shower or tub surround — no. The waterproofing is too critical and too easy to get wrong. A failed DIY shower membrane doesn’t just mean retiling; it means structural repair to the framing behind it. The cost of bathroom tile installation done right the first time is always less than the cost of fixing a leak two years later.